V2Ray,是Victoria Raymond以及其社群团队开发的Project V下的一个工具。Project V是一个工具集合,号称可以帮助其使用者打造专属的基础通信网络。Project V的核心工具称为V2Ray,其主要负责网络协议和功能的实现,与其它Project V通信。
安装服务端
通过一行命令即可完成v2ray的服务端安装
1
|
curl -Ls https://raw.githubusercontent.com/v2fly/fhs-install-v2ray/master/install-release.sh | sudo bash
|
此时v2ray会安装到/usr/local/bin/v2ray,配置文件在/usr/local/etc/v2ray/config.json
然后需要编辑配置文件
1
|
vim /usr/local/etc/v2ray/config.json
|
一个典型的配置文件如下:
 1
 2
 3
 4
 5
 6
 7
 8
 9
10
11
12
13
14
15
16
17
18
19
20
21
22
23
24
25
26
27
28
29
|
{
    "inbounds": [
        {
            "port": 6379,
            "listen": "127.0.0.1",
            "protocol": "vmess",
            "settings": {
                "clients": [
                    {
                        "id": "{使用uuid生成一个新的uuid}",
                        "alterId": 64
                    }
                ]
            },
            "streamSettings": { //如果不配置https,则这一部分不需要
                "network": "ws",
                "wsSettings": {
                    "path": "/ray" //注意这个路径
                }
            }
        }
    ],
    "outbounds": [
        {
            "protocol": "freedom",
            "settings": {}
        }
    ]
}
|
文件中需要替换的部分为
port:修改为自己的port,注意port需要能在公网访问到;
id: uuid生成的一个长度为36的uuid,需要自己生成;
然后运行如下命令启动v2ray
1
2
|
systemctl start v2ray
systemctl status v2ray
|
配置域名访问+websocket
如果需要配置域名访问则需要执行配置域名访问这一步
首先需要安装nginx
 1
 2
 3
 4
 5
 6
 7
 8
 9
10
11
12
13
14
15
|
# 安装一些依赖
apt-get update --fix-missing
sudo apt-get install libpcre3 libpcre3-dev openssl libssl-dev build-essential git tree zlib1g-dev
# 安装nginx
wget http://nginx.org/download/nginx-1.20.2.tar.gz
tar -zxvf nginx-1.20.2.tar.gz
cd nginx-1.20.2/
./configure --with-http_ssl_module
make && make install
# 配置nginx环境变量
echo 'PATH=$PATH:/usr/local/nginx/sbin/'>>/etc/profile
source /etc/profile
nginx -v
# 编辑systemd文件
vim /lib/systemd/system/nginx.service
|
nginx.service文件如下
 1
 2
 3
 4
 5
 6
 7
 8
 9
10
11
12
13
|
[Unit]
Description=nginx
After=network.target

[Service]
Type=forking
ExecStart=/usr/local/nginx/sbin/nginx
ExecReload=/usr/local/nginx/sbin/nginx -s reload
ExecStop=/usr/local/nginx/sbin/nginx -s quit
PrivateTmp=true

[Install]
WantedBy=multi-user.target
|
然后启动nginx
1
2
3
4
5
|
sudo systemctl enable nginx
sudo systemctl start nginx
sudo systemctl status nginx
# 查看是否能够正常请求
curl $(hostname -i):80
|
编辑nginx的conf文件vim /usr/local/nginx/conf/nginx.conf
 1
 2
 3
 4
 5
 6
 7
 8
 9
10
11
12
13
14
15
16
17
18
19
20
21
22
23
24
25
26
27
28
29
30
31
32
33
34
35
36
37
38
39
40
41
42
43
44
45
46
47
48
49
50
51
52
53
54
55
56
57
58
59
60
61
62
63
64
65
66
67
68
69
70
71
72
|
#user  nobody;
worker_processes  1;

#error_log  logs/error.log;
#error_log  logs/error.log  notice;
#error_log  logs/error.log  info;

#pid        logs/nginx.pid;


events {
    worker_connections  1024;
}


http {
    include       mime.types;
    default_type  application/octet-stream;

    sendfile        on;

    keepalive_timeout  65;

    server {
        listen       80;
        server_name  localhost;

        location / {
            root   html;
            index  index.html index.htm;
        }

        #error_page  404              /404.html;

        # redirect server error pages to the static page /50x.html
        #
        error_page   500 502 503 504  /50x.html;
        location = /50x.html {
            root   html;
        }
    }

    # HTTPS server
    #
    server {
        listen       443 ssl;
        server_name  {换成自己的域名};

        ssl_certificate      /usr/local/nginx/ssl/cert.pem;
        ssl_certificate_key /usr/local/nginx/ssl/cert.key;

        ssl_session_cache    shared:SSL:1m;
        ssl_session_timeout  5m;

        #ssl_ciphers  HIGH:!aNULL:!MD5;
        ssl_prefer_server_ciphers  on;
        ssl_ciphers ECDHE-RSA-AES128-GCM-SHA256:ECDHE:ECDH:AES:HIGH:!NULL:!aNULL:!MD5:!ADH:!RC4;
        ssl_protocols TLSv1.1 TLSv1.2 TLSv1.3; #表示使用的TLS协议的类型。
        location /ray { # 与 V2Ray 配置中的 path 保持一致
            proxy_redirect off;
            proxy_pass http://127.0.0.1:6379; #假设WebSocket监听在环回地址的6379端口上
            proxy_http_version 1.1;
            proxy_set_header Upgrade $http_upgrade;
            proxy_set_header Connection "upgrade";
            proxy_set_header Host $http_host;

        	# Show realip in v2ray access.log
            proxy_set_header X-Real-IP $remote_addr;
            proxy_set_header X-Forwarded-For $proxy_add_x_forwarded_for;
        }
    }
}
|
然后重启nginx
1
2
|
nginx -t
nginx -s reload
|
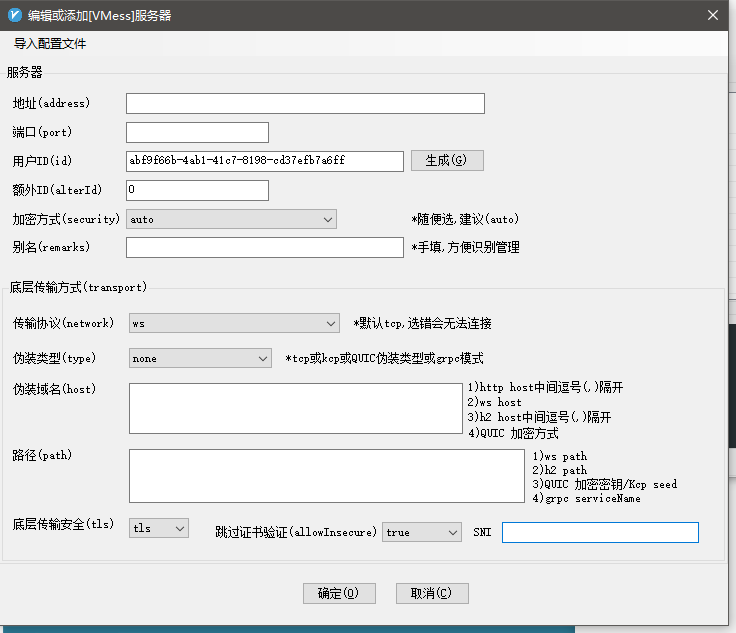
配置客户端
这里假设你已经下载了客户端了,打开客户端,添加服务器,编辑如下图:按照上面的配置来新增一个服务器。
然后将代理设置为清除系统代理。这样就建立了从客户端到服务端的连接,但是此时浏览器还是不能够访问。需要按照一个Chrome代理插件SwitchyOmega,配置如下所示。
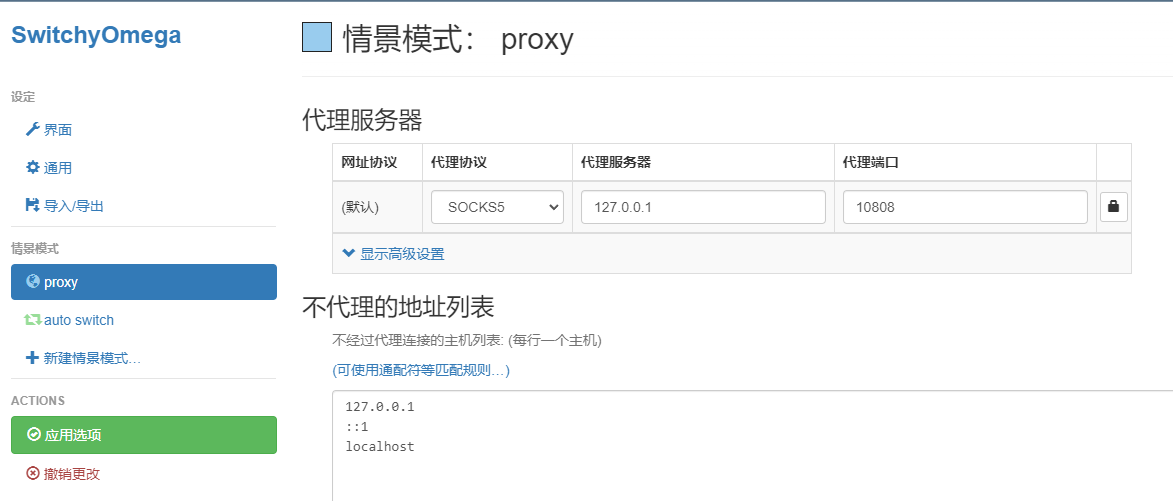
然后就可以愉快的使用VPN了。
如果使用的是OpenWrt,则可以直接使用OpenWrt提供的PassWall服务,一个典型的配置如下图
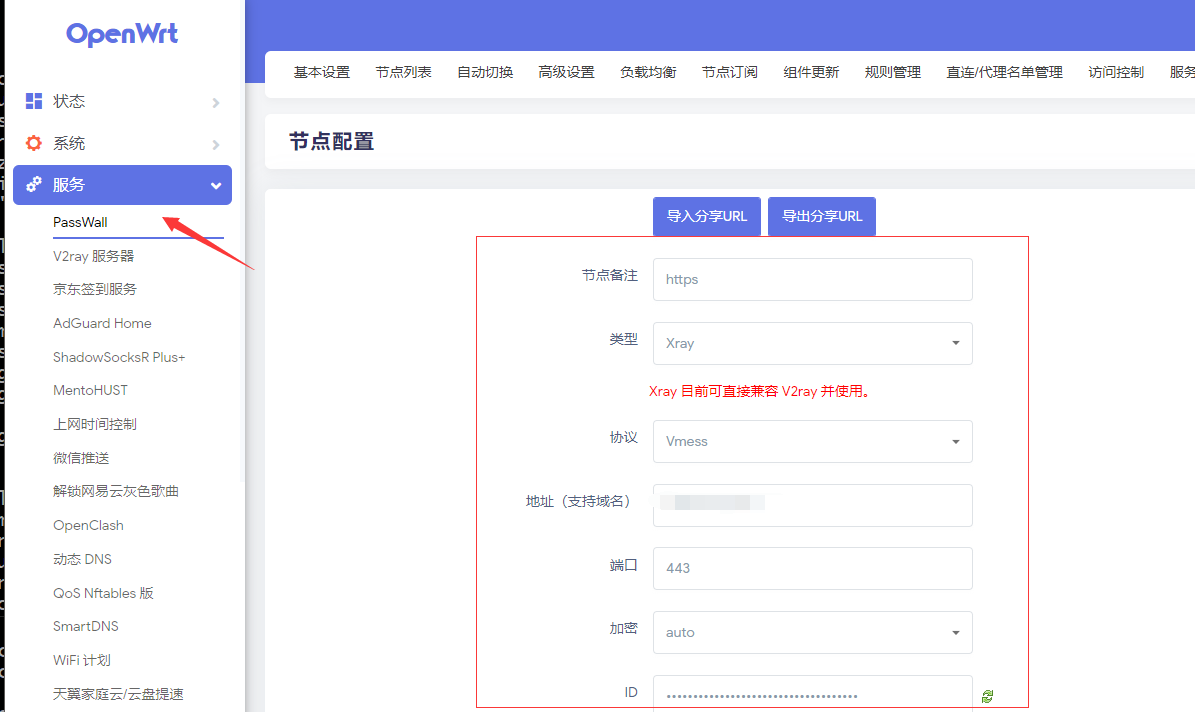
通过OpenWrt的配置,可以无需其他工具,在设备上的所有应用程序均可以使用VPN网络。
总结
- 需要按照步骤安装服务端和客户端;
- 域名+ws的方式需要额外安装nginx和申请ssl证书;
- 使用客户端需要额外的proxy插件才能连接上vpn;
- 本文提供的步骤仅供测试使用;
